Selasa, 21 Juli 2009

Mengkompres File PDF menggunakan Free PDF Compressor

Free PDF Compressor adalah sebuah freeware yang berfungsi untuk mengkompres file PDF. Dengan mengkompres lebih banyak file PDF menggunakan Free PDF Compressor maka paling tidak ruang pada harddisk bisa menjadi lebih lega dari sebelumnya. Freeware yang dibuat oleh NicePDF ini hanya berukuran 288 KB dan mengklaim dapat mengkompres hingga 60% dari ukuran file pdf aslinya. Selain itu pula, freeware ini juga bersifat portable sehingga dapat dijalankan tanpa harus diinstal di komputer.

Free PDF Compressor juga sangat mudah digunakan karena pilihan perintah yang ada hanya sedikit dan mudah dimengerti. Tercatat ada 2 pilihan algoritma kompresi, yaitu Flate dan RunLength. Sementara untuk level kompresinya tersedia dalam 3 pilihan, yaitu Default, Fastest dan Maximum.
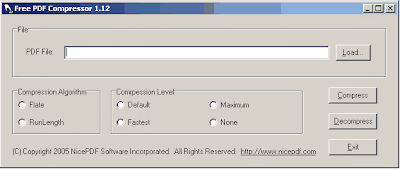

Berikut ini adalah panduan cara mengkompres file PDF menggunakan Free PDF Compressor

  1. Jalankan Free PDF Compressor.
  2. Pilih dan arahkan file PDF yang akan dikompres dengan cara menekan tombol Load (Alt+L).

    Sebagai contoh, file PDF yang akan dikompres mempunyai ukuran 528 KB (541,399 bytes).
  3. Pilih algoritma dan level kompresi sesuai dengan keinginan Anda. Pada saat uji coba, hampir tidak ada perbedaan yang ditemui pada hasil kompresi untuk setiap algoritma dan level kompresi yang berbeda.
  4. Tekan Compress untuk melakukan kompresi. Pilih nama baru atau folder lain jika tidak ingin menimpa/mengganti file PDF asli. Ukuran file yang akan dikompresi dan level kompresi yang dipilih menentukan lamanya waktu kompresi.
  5. Setelah kompresi selesai dilakukan, Free PDF Compressor akan menampilkan ukuran file setelah dikompres.

    Terlihat bahwa ukuran file hasil kompresi lebih kecil daripada ukuran aslinya, yaitu 347 KB (355,474 bytes) atau 65% ukuran aslinya.
Update 27 Januari 2013 : 
Software yang dipakai pada saat tulisan ini dibuat adalah Free PDF Compressor versi 1.12.
Versi yang berbeda dari software yg sama mungkin akan mempunyai pengaruh yg berbeda seperti ukuran kompresi dan batasan penggunaan (shareware)

Jumat, 24 April 2009

Yahoo stops GeoCities services

Yahoo decided to close GeoCities, a free personal web hosting, by the end of 2009. Yahoo also decided to discontinue the process of allowing new customers to sign up for GeoCities accounts. Meanwhile, existing GeoCities accounts can still continue their personal web site and GeoCities services until the end of year 2009.


By June 1997, GeoCities was the fifth most popular site on the Web. Yahoo, which previously invested on Geocities, afterward purchase it on January 1999 for $3.57 billion and taking control on May 28, 1999. Yahoo acquired more than $4 billion for 10 years from Geocities.

Rabu, 08 April 2009

Hide your private folder on Windows XP

For a some reason, maybe you have some personal data or private files in your computer that you want to hide it from someone else. If you're a Windows XP user, you can use the following way to hide your files remain secure from being accidentally access by other people
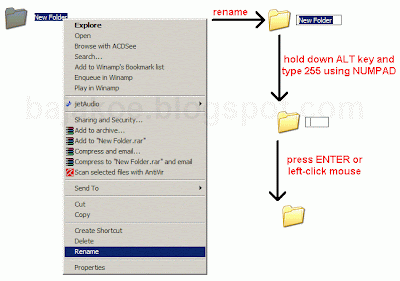
  1. Create a folder and move your personal data or private files to that folder
  2. Rename that folder using a "blank" name by hold down an ALT key and type "255" (without quote) using NUMPAD on your keyboard. Then press ENTER or left-click your mouse

  3. Right click on that folder and select Properties. Then, select Customize tab and click on Change Icon to change folder icon. Find an "invisible" icon and click OK.

  4. Right click on that folder again and select Properties. Change the folder attribute into Hidden.
  5. Now you have a hidden private folder
Note :
If you using a laptop, you can access Numpad key by hold down Fn key. The Numpad key usually have some color with Fn key. So, when you rename the folder, hold down both Fn and ALT key then type 255.

Sabtu, 28 Maret 2009

iRobot Roomba 535 Robotic Vacuum

If you feel lazy to clean the house, maybe you could try a new technology from iRobot to clean your house. By using iRobot Roomba 535 Robotic Vacuum, you can easily clean your house because this gadget doesn't need too much your intervention. You just only press the Clean Button and iRobot Roomba 535 Robotic Vacuum will do the rest.
iRobot Roomba 535 Robotic Vacuum is ideal to clean floor and carpet from dust, dirt, debris, and bug. Equipped with the Virtual Wall Lighthouse that use infrared signals, iRobot Roomba can clean one room to another room with efficient without having hit any obstruction in a room. If Roomba detects dirtier areas, it will spends more time cleaning them. iRobot Roomba 535 Robotic Vacuum powered by two rechargeable batteries (C Type battery ) and automatically returns to its self-charging base to recharge the battery even between cleaning.

iRobot Roomba 535 Robotic Vacuum sold for $299.99 and you can get it on store.irobot.com. Also in the box you will get :
  • 1 iRobot Roomba 530
  • 2 Virtual Walls (Require 2 D batteries each, not included)
  • 1 Self-charging Home Base
  • 1 Power Supply (3 hour charge time)
  • 1 Brush Cleaning Tool
  • 1 Rechargeable Battery
  • 1 Extra Filter
  • 1-year Manufacturer's Warranty

Sabtu, 14 Maret 2009

System Mechanic 8.5.3.5

Keep your new PC running fast and problem-free. System and registry clutter will degrade your computer's performance, leading to crashes, longer boot times, and system errors.

System Mechanic combines over 40 powerful PC tuneup tools to clean hard drive clutter, repair your registry, defragment drives and memory, manage programs, boost your internet connection, and remove spyware.

System Mechanic automatically repairs errors and fragmentation, cleans out clutter, and tunes up your PC -- so that it runs smoothly, reliably, and up to 300% faster!

Minggu, 08 Maret 2009

Tips to cleaning your computer RAM

When we running a program or playing game on the computer for a long time, the computer performance will be slowing down. This may happen because some unnecessary process from the program or game are still remain in the computer memory (RAM)..

To clean the RAM from those unnecessary process, you can do the following tips in order to make your computer's performance better than before.
  1. Open notepad and type
  2. Save the document in any name with *.vbs file type (choose save as type option to "All Files). Example, ram-cleaner.vbs
  3. Run/double click that file to clean your RAM
You can edit the code to clean the memory in greater amount, for example :

Internet Download Manager 5.14.1.0

Internet Download Manager (IDM) is a tool to increase download speeds by up to 5 times, resume and schedule downloads. Comprehensive error recovery and resume capability will restart broken or interrupted downloads due to lost connections, network problems, computer shutdowns, or unexpected power outages. Simple graphic user interface makes IDM user friendly and easy to use.

Internet Download Manager has a smart download logic accelerator that features intelligent dynamic file segmentation and safe multipart downloading technology to accelerate your downloads. Unlike other download managers and accelerators Internet Download Manager segments downloaded files dynamically during download process and reuses available connections without additional connect and login stages to achieve best acceleration performance.

Features :
  • All popular browsers and applications are supported
  • Automatic Antivirus checking
  • Built-in Scheduler
  • Customizable Interface
  • Download Categories
  • Download Speed Acceleration
  • Download Resume
  • Drag and Drop
  • Easy downloading with one click
  • Multilingual
  • Includes web site spider and grabber
  • Supports many types of proxy servers

Rabu, 04 Maret 2009

Create "Select All" Box

Maybe there are some of us who want to share some text or code in the blog will usually write it directly on the blog article. And then, the readers which interested copying the text or the code will usually dragging the text and then copying it.

To make it more easier, we can put that text or code in a "select all" box. When people click on the box, the text or code will automatically dragged and it can be directly copied. This method also can make the visitor more easier to drag a long text or code.

To create the "select all" box, write your post on Edit Html Mode and then put your text or code using this code.

And it will be shown on your blog like this. Try it by clicking the text inside the box
You can change the number of rows and cols in order to show how many rows and columns of text that would directly appear on your article.

Senin, 02 Maret 2009

Placing embedded video on the blog

There are many online video sites on the internet that offers an interesting video to watch. Some of them are Youtube and Metacafe.

Sometimes, we may also want to show the video that we have seen before in our blog. Either we just only share it for our blog visitor or display it as a supporting information for article that we created.

To display the video which hosted in online video sites to our blog is very easy. As an example here, i'll show you how to place embedded video from Youtube.
  1. First, find the video from youtube which you want to display it on your blog. As an example, i choose "How to create a blog with Blogger" video.


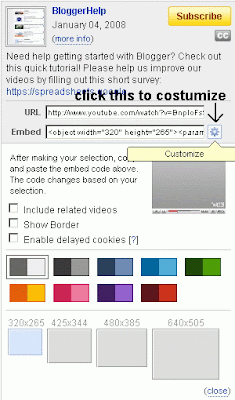
  2. You can easily show the video on your blog by copying the embedded video code and paste the code to your post.

  3. The "How to create a blog with Blogger" video has embedded code like this :

  4. Click the customize button to change the video display into custom size and style

IOGEAR Wireless USB to VGA Adapter Kit

The IOGEAR Wireless USB to VGA Adapter Kit is the first wireless USB to VGA kit that enables PC user to extend or clone their desktop to another monitor wirelessly. This product also has received an International CES 2009 Innovations Design and Engineering Award from the Consumer Electronics Association (CEA).


According to IOGEAR, currently the Wireless USB to VGA Adapter Kit only compatible with Windows XP 32-bit and Vista 32-bit or 64-bit. The kit consists of :
  • 1 x Wireless USB Host adapter (for PC)
  • 1 x Wireless USB to VGA adapter (for monitor)
  • 1 x Wireless USB to Audio Adapter (for stereo)
  • 2 x Power Adapter
  • Installation CD
  • Quick Start Guide
  • 1 x USB 2.0 A to mini-B Cable (3 ft)
  • 1 x Gold Plated VGA cable (6 ft)
  • 1 x 3.5mm to 3.5mm cable
  • 1 x 3.5mm to RCA cable
  • 1 x Velcro® fabric hook-and-loop fastener
  • Warranty/Registration Card
The Wireless USB to VGA kit is very easy to use. Simply, connect the USB adapter to a desktop or laptop that already installed with the kit driver and connect the VGA adapter to a VGA display like TV or projector. Then your ready to extend your desktop to another screen wirelessly.


This kit provides HD video streaming up to 720p between a PC and flat screean TV or projector within 30 feet distance. Multitasking can also be simplified by utilizing the picture-in-picture function on a TV in order to stay on top of work and entertainment needs. Users can watching a football game while viewing a Fantasy Football grid on the same screen.

The IOGEAR Wireless USB to VGA Adapter Kit can be found on shopiogear.com and sold for $229.95

Kamis, 26 Februari 2009

Some tips to get more visitor for our blog

Visitor is one of the important thing that must be considered when we creating a blog. If we create a blog then we also want that other people know about our blog.

Although our blog content may be very useful for other people but it would be useless if there is no visitor or rarely visitor came to our blog. Therefore, blog must be introduced to other people so that they know about our blog.

There are several ways that can be done to introduce our blog to other people.
  1. Submit our blog to search engine or blog catalog.
  2. Don't forget to ping the search engine or blog catalog when we update the blog or post a new article
  3. Do a blogwalking. Put your comment related to their article and use our blog URL as a backlink and don't spam their blog because they didn't like it
  4. Promote our blog using a chatbox in other blog. Also, don't spam on their chatbox
  5. Mail your friend about your blog
  6. Add our blog as signature on forum. Read the forum rules before you doing this because some of them not allow it.
I hope these tips can bring more visitor to your blog.

Why Website Monitoring Is Important

If you’ve run your own web site or blog for any time at all then you’ve undoubtedly gone to your site at one point or another only to find it’s not online! Like most of us you probably called your web hosting company (you did get one with a technical support phone number didn’t you?) and they started working on the problem.

The only trouble is how long was your site down? How many visitors did you loose? How many sales were lost? The questions are endless.

But even if your site is online it may be too slow for people to use at times throughout the day. How would you know this? Well truthfully you wouldn’t but what you would see is a decrease in traffic. You might think you’re loosing visitors when really it’s just that your web site is too slow.

These questions plagued me for some time about my site. The good news is there are services that will send you an email (or text message to your cell phone) the minute your web site goes down. They will also measure how fast your site is throughout the day and give you nice graphical reports of how your site is performing hour-by-hour and day-by-day.

I recently came across such a service called InternetUptimeMonitor.com. They do all of the above and I’ve been pretty pleased with their service on my site. It gives me a lot of piece of mind knowing that throughout the day if my site goes down I’ll get an email.

If I have a day with low traffic do you know the first place I check? You got it—InternetUptimeMonitor.com. Why? Because maybe my site was really slow and that’s why my traffic was down!

InternetUptimeMonitor.com offers two flavors of their service Free and Paid (for Businesses). The differences between the two accounts are how often they check your site, if they watch it from around the world or just the USA, and if you get cell-phone text messages alerts or just email alerts.

If you’re a business that’s making any money at all online I’d recommend their business (Gold membership) because it costs you too much money to have your site down. If you’ve got a blog and use it for fun or aren’t making much money yet use the free membership.

Use this link below you’ll get 65% off their premium package when you’re ready to order. This is a special link I’ve been given for readers of my site and it’s not available to the general public:

Start Monitoring Your Website Now

Everyone should monitor his or her web site because you never know the next time your site will go down.

Rabu, 25 Februari 2009

Browse a webpage using email

Generally, if we want to browse a webpage, we usually use a browser to visit it. However, there is a new way to browse a webpage using our email. We can browse a webpage and receive it in our email inbox using Webinmail service.

In order to do that, go to your email account or use your email client to request the webpage that you wanted to browse. Put the webpage URL as email subject and send it to browse@webinmail.com. For the example, i request my blog as the webpage which i want to browse.


Wait for a moment and then the requsted webpage will arrive in your inbox. The waiting time depends on the size of the webpage.

Senin, 16 Februari 2009

Rangkaian Dioda: Penyearah Tegangan

Sebagai penyearah tegangan, dioda digunakan untuk mengubah tegangan bolak-balik (AC) menjadi tegangan searah(DC). Penyearah tegangan ini ada 2 macam, yaitu :
1. Penyearah setengah gelombang (half-wave rectifier)
2. Penyearah gelombang penuh (full-wave rectifier)

1. Penyearah setengah gelombang (half-wave rectifier)
Saat digunakan sebagai penyearah setengah gelombang, dioda menyearahkan tegangan AC yang berbentuk gelombang sinus menjadi tegangan DC hanya selama siklus positif tegangan AC saja. Sedangkan pada saat siklus negatifnya, dioda mengalami panjaran balik (reverse bias) sehingga tegangan beban (output) menjadi nol.

Pada contoh diatas, anggaplah Vin sebagai tegangan input rangkaian setelah diturunkan oleh transformator yang mempunyai nilai sebesar 20Vpp atau 7,071VRMS. Setelah disearahkan menggunakan dioda maka akan di dapat nilai tegangan DC atau nilai rata-ratanya.


Dari hasil simulasi dengan contoh perhitungan diatas terlihat bahwa terdapat perbedaan nilai. Hal ini bisa disebabkan karena komponen pada simulasi tidak ideal dan ini juga bisa terjadi pada percobaan secara langsung. Nilai tegangan yang ditunjukkan pada multimeter adalah nilai komponen AC (VAC) atau DC (VDC) saja. Sementara, untuk mengetahui tegangan puncak ke puncak (Vpp) diperlukan pengukuran menggunakan osiloskop atau bisa juga dengan perhitungan setelah VAC sudah diketahui.
Catatan : VAC = VRMS = VEFEKTIF

2. Penyearah gelombang penuh (full-wave rectifier)
Saat digunakan sebagai penyearah gelombang penuh, dioda secara bergantian menyearahkan tegangan AC pada saat siklus positif dan negatif. Penyearah gelombang penuh ada 2 macam dan penggunaannya disesuaikan dengan transformator yang dipakai. Untuk transformator biasa digunakan jembatan dioda (dioda bridge) sementara untuk transformator CT digunakan 2 dioda saja sebagai penyearahnya.
a. Penyearah gelombang penuh dengan jembatan dioda (dioda bridge)
Pada dioda bridge, hanya ada 2 dioda saja yang menghantarkan arus untuk setiap siklus tegangan AC sedangkan 2 dioda lainnya bersifat sebagai isolator pada saat siklus yang sama. Untuk memahami cara kerja dioda bridge, perhatikanlah kedua gambar berikut.

Saat siklus positif tegangan AC, arus mengalir melalui dioda B menuju beban dan kembali melalui dioda C. Pada saat yang bersamaan pula, dioda A dan D mengalami reverse bias sehingga tidak ada arus yg mengalir atau kedua dioda tersebut bersifat sebagai isolator.

Sedangkan pada saat siklus negatif tegangan AC, arus mengalir melalui dioda D menuju beban dan kembali melalui dioda A. Karena dioda B dan C mengalami reverse bias maka arus tidak dapat mengalir pada kedua dioda ini.

Kedua hal ini terjadi berulang secara terus menerus hingga didapatkan tegangan beban yang berbentuk gelombang penuh yang sudah disearahkan (tegangan DC). Grafik sinyal dari penyearah gelombang penuh dengan jembatan dioda (dioda bridge) ditunjukkan seperti pada gambar berikut

Jembatan dioda (dioda bridge) tersedia dalam bentuk 1 komponen saja atau pun bisa dibuat dengan menggunakan 4 dioda yang sama karakteristiknya. Yang harus diperhatikan adalah besar arus yang dilewatkan oleh dioda harus lebih besar dari besar arus yang dilewatkan pada rangkaian.

b. Penyearah gelombang penuh menggunakan 2 dioda
Seperti telah disebutkan diatas, penyearah gelombang penuh menggunakan 2 dioda ini hanya bisa digunakan pada transformator CT, dimana tegangan sekunder yang dihasilkan oleh trafo CT ini adalah :

dimana V1=teg primer dan V2=teg sekunder
Cara kerja penyearah gelombang penuh jenis ini dapat dijelaskan seperti berikut :

Pada artikel mengenai trafo diketahui bahwa pada bagian sekunder trafo CT terdapat 2 sinyal output yang terjadi secara bersamaan, mempunyai amplitudo yang sama namun berlawanan fasa. Saat tegangan input (teg primer) berada pada siklus positif, pada titik AO akan terjadi siklus positif sementara pada titik OB akan terjadi siklus negatif. Akibatnya D1 akan mengalami panjaran maju (forward bias) sedangkan D2 mengalami panjaran balik (reverse bias) sehingga arus akan mengalir melalui D1 menuju ke beban dan kembali ke titik center tap.

Saat tegangan input (teg primer) berada pada siklus negatif, pada titik AO akan terjadi siklus negatif sementara pada titik OB akan terjadi siklus positif. Akibatnya D2 akan mengalami panjaran maju (forward bias) sedangkan D1 mengalami panjaran balik (reverse bias) sehingga arus akan mengalir melalui D2 menuju ke beban dan kembali ke titik center tap.

Dari penjelasan cara kerja penyearah gelombang penuh jenis ini terlihat bahwa tegangan yang terjadi pada beban mempunyai polaritas yang sama tanpa memperdulikan dioda mana yang menghantar karena arus mengalir melalui arah yang sama sehingga akan terbentuk gelombang penuh yang disearahkan seperti ditunjukkan pada grafik sinyal berikut.

Sabtu, 31 Januari 2009

Change Program Files Directory Location

When we install a software, by default it will be installed in C:\Program Files. It happen because when we install Windows for the first time, we put it in the C: directory.

The more programs that are installed in the C: directory will causing more used space otherwise the free space will become smaller. To handle this situation, we can change the location of the installation directory to another directory.

To make this change happen, do the following steps :
  1. Click Start, click Run, type regedit , and then click OK

  2. Locate and then click the following registry subkey:
  3. HKEY_LOCAL_MACHINE\SOFTWARE\Microsoft\Windows\CurrentVersion

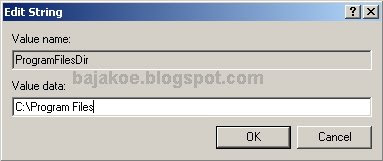
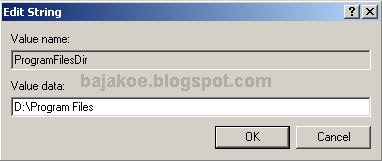
  4. In the details panel (the right section), right-click or double-click the ProgramFilesDir registry to modify the value

  5. In the Value data box, type the new default location for the Program Files folder, e.g . D:\Program Files. Then click OK

  6. Exit Registry Editor then restart your PC to take an effect.